Table of Contents
Looking for a new Jio eSIM connection or to convert your existing physical SIM? This article shows you how to get, convert to eSIM, and activate it on your device step-by-step.
Reliance Jio Infocomm Limited, is a major telecommunications company in India. Jio played a significant role in transforming the digital landscape in India, and it has also embraced eSIM technology to offer users a more flexible and convenient mobile experience.
Is your Device Compatible with Jio eSIM?
You have three methods to initiate Jio eSIM activation. You can convert your existing physical SIM to eSIM, transfer your Jio eSIM from one device to another via SMS, or get a new Jio eSIM connection.
To begin, the first step is to check if your phone supports eSIM. For guidance on this, refer to the article: ‘How to Check if My Phone Supports eSIM‘.
You can also check the compatibility with Jio’s website: ‘Jio eSIM Compatibility‘.
How to Get a New eSIM with Jio
If you want a new eSIM connection with Jio, Here’s how you can do it:
- Visit a Jio Store with your eSIM-compatible device.
- Request for eSIM to the store representative.
- Provide valid proof of identity and address documents to complete the Know Your Customer (KYC) process.
The required documents for KYC typically includes documents like Aadhaar card, passport, voter ID, etc. - Once your request is processed and KYC is complete, the store staff will assist you with activating your new Jio eSIM connection on your device.
How to Convert / Change Existing Jio SIM to eSIM?
You can switch your physical SIM to eSIM on any Devices in 4 Easy Steps:
- Initiate eSIM request by sending an SMS
- Share your consent via SMS
- Enter eSIM number on IVR
- Install the data plan on your iOS device to activate eSIM
To get started with the process, make sure you have:
- An eSIM-compatible device.
- Your email ID registered for your Jio number.
- The EID number and IMEI number of the device on which you wish to activate your Jio eSIM.
To learn out how to check the registered email on your My Jio app, visit the FAQ section.
To find out the EID and IMEI number of your device, you can follow this article: ‘How to find the EID number and IMEI number on My Device‘
Step 1: Initiate Jio eSIM Request via SMS
- Open messages and compose a new SMS.
- Type GETESIM <space><32 Digit EID><space><15 Digit IMEI> and send to 199 from the Jio number you wish to upgrade to eSIM.
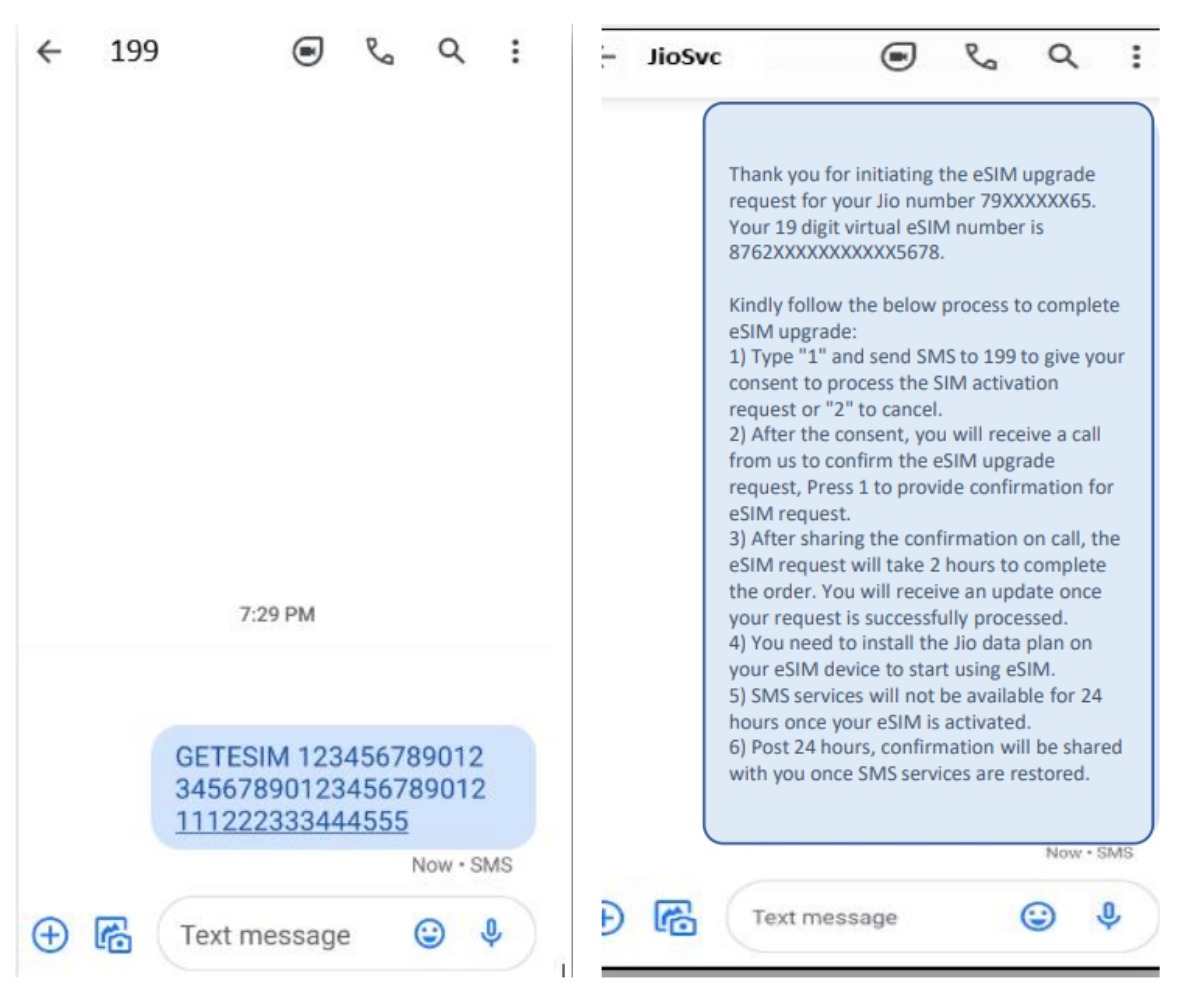
If you receive a revert SMS asking to update your email ID, proceed to update your email ID in your account as suggested at the beginning of this document.
Note: If you are outside India, send the SMS to +917021999199 instead of 199. International roaming services or a plan are required to send SMS and receive calls in this scenario.
Upon sending the correct EID and IMEI numbers to 199, you will receive a confirmation SMS and email. If a revert SMS or email requests the correct EID and IMEI numbers, reverify and resend the SMS.
Step 2: Share Consent via SMS
- Open messages and compose a new SMS.
- Type 1 and send SMS to 199.
If you are outside India, send the SMS to +917021999199 instead of 199.
After sending the consent SMS:
If you have an iOS device (iPhone/iPad), you will receive a confirmation SMS and notification on your device indicating that the ‘Jio Data Plan is ready to be installed’.
Do not clear, delete, or click on this notification at this time; it will be needed after completing the next steps. If you miss the notification, an SMS with your eSIM activation details will be sent to your Jio number.
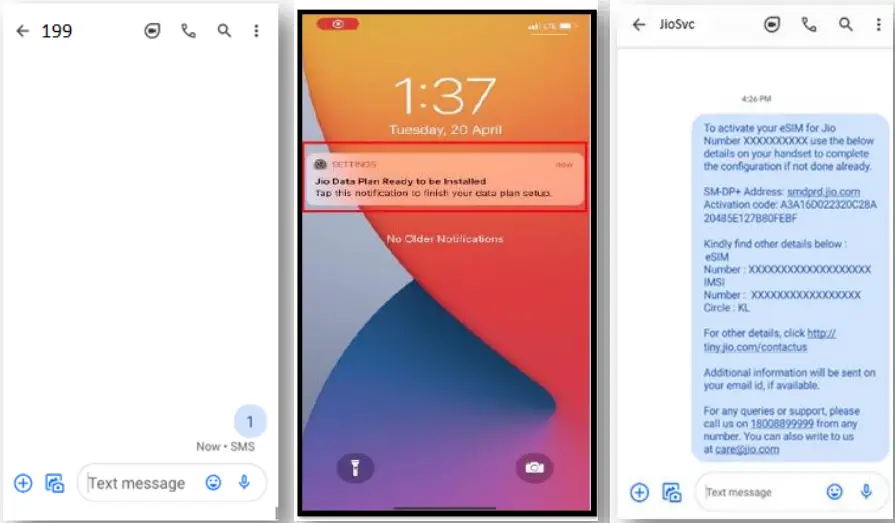
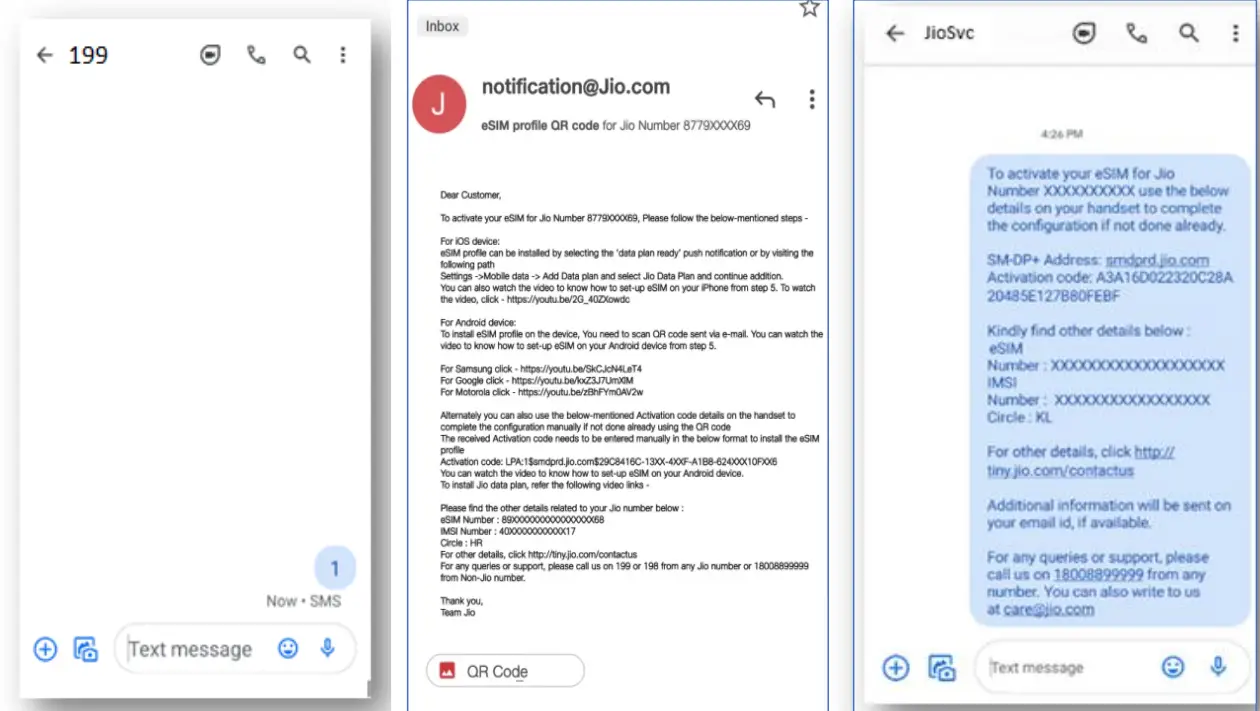
If you have a device other than iOS, you will receive a confirmation SMS and a QR code via email on your registered email ID. Additionally, the activation code details will be sent to your Jio number through SMS.
It is crucial not to delete the QR code email or the activation code SMS, as you will need them later to install the eSIM profile on your device.
To cancel your eSIM request, type 2 and send to 199.
Step 3: Enter eSIM number on IVR
Within 10 minutes of sending the consent SMS, you will receive a call from +912235072222 on your Jio number. Press 1 to share your consent on the automated call. After sharing consent, a confirmation SMS and email will be sent to you.
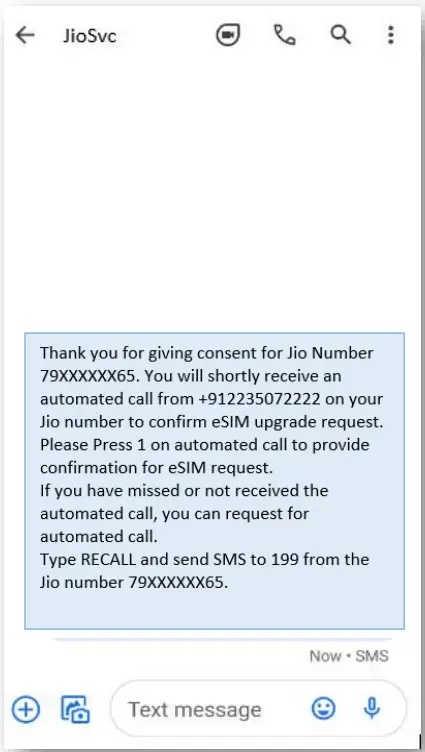
If you miss the IVR call, request a recall by typing RECALL and sending an SMS to 199. If you don’t receive the IVR call within 10 minutes, check your missed call list or review spam blocking settings on your phone.
After sharing your consent on the IVR call, wait for 2 hours while Jio processes your request. Note that during this period, you can use all services on your existing SIM.
Upon receiving an SMS indicating the completion of this process, your physical SIM will stop working, and your phone will display ‘No Network.’ Ensure your new iOS device is connected to the internet using Wi-Fi or Mobile Hotspot for the next step.
Step 4 : Install the Data Plan on Your Device to Activate eSIM
To proceed with this step, navigate to the next section where I have provided a step-by-step guide for various devices, including iOS, Samsung, Google, Motorola, Nokia, Vivo, etc.
How to Install and Activate Jio eSIM on My Device
Great! Now that you have the QR Code or notification (for iOS only), let’s see how to to install and activate the plan. First of all, ensure that your smartphone is connected to the internet. Then, follow the device-specific guide.
Jio eSIM Activation on Apple Devices (iPhone/iPad)
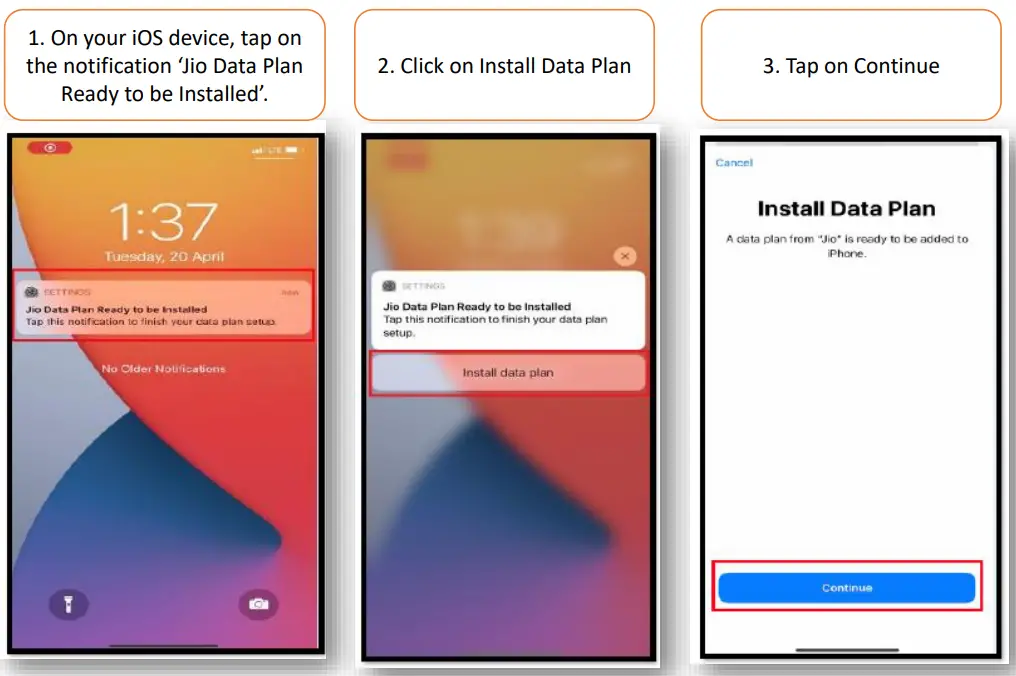
Install & Activate eSIM via Notification
To activate Jio eSIM via notification:
- On your iOS device, tap on the notification ‘Jio Data Plan Ready to be Installed.’
- Click on ‘Install Data Plan.’
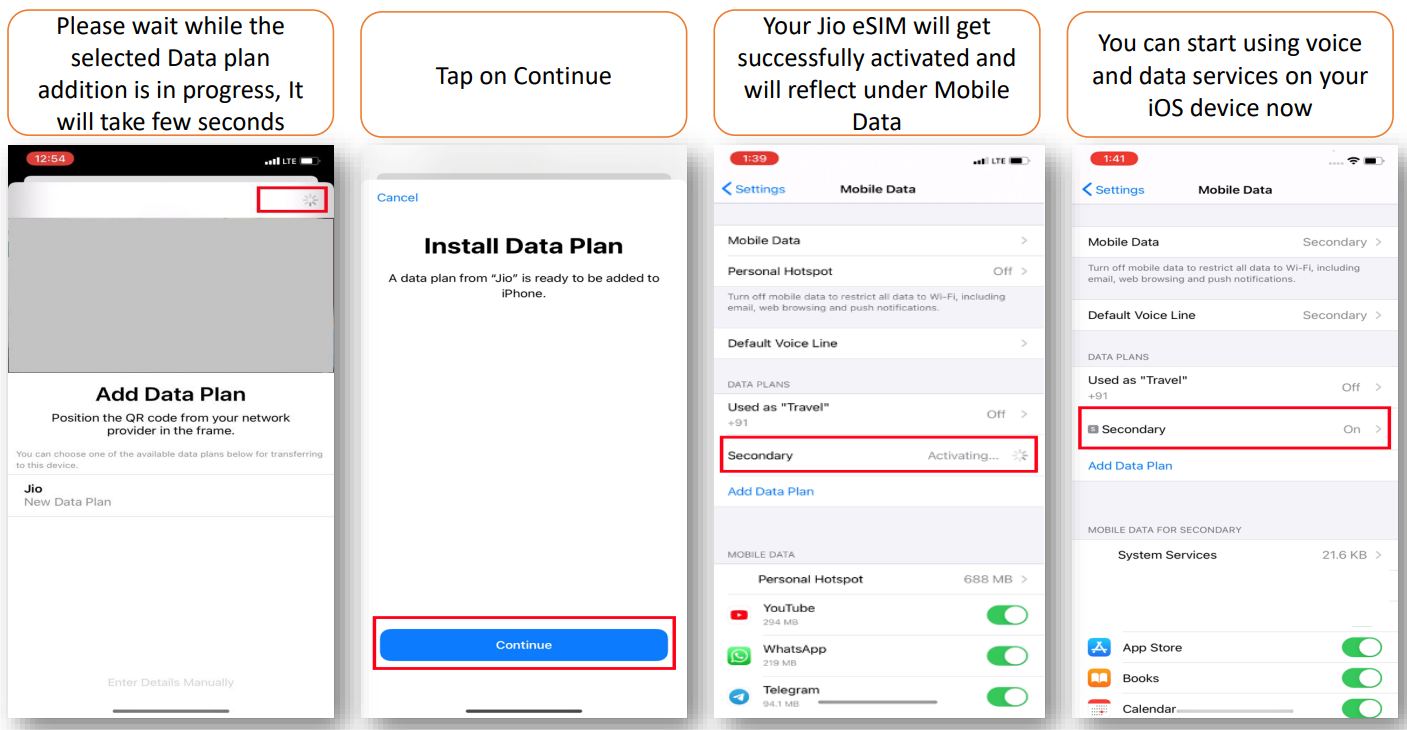
- Tap on ‘Continue.’
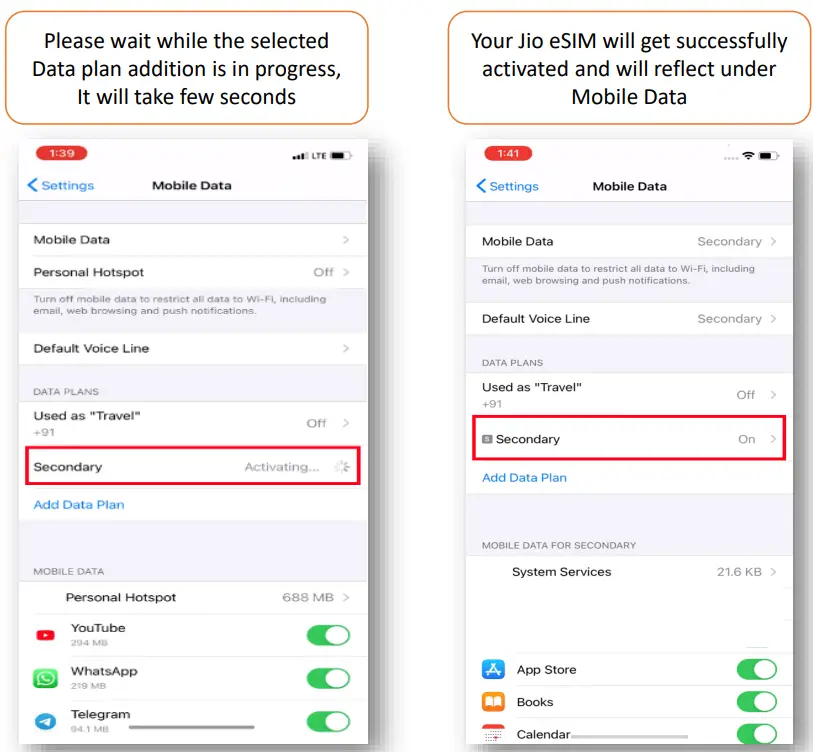
- Please wait while the selected data plan addition is in progress. It will take a few seconds.
- Your Jio eSIM will be successfully activated and you can now start using voice and data services on your iOS device.
Install & Activate eSIM via Settings
If you cleared the notification, you can activate Jio eSIM on your iOS device vis Settings. To do so:
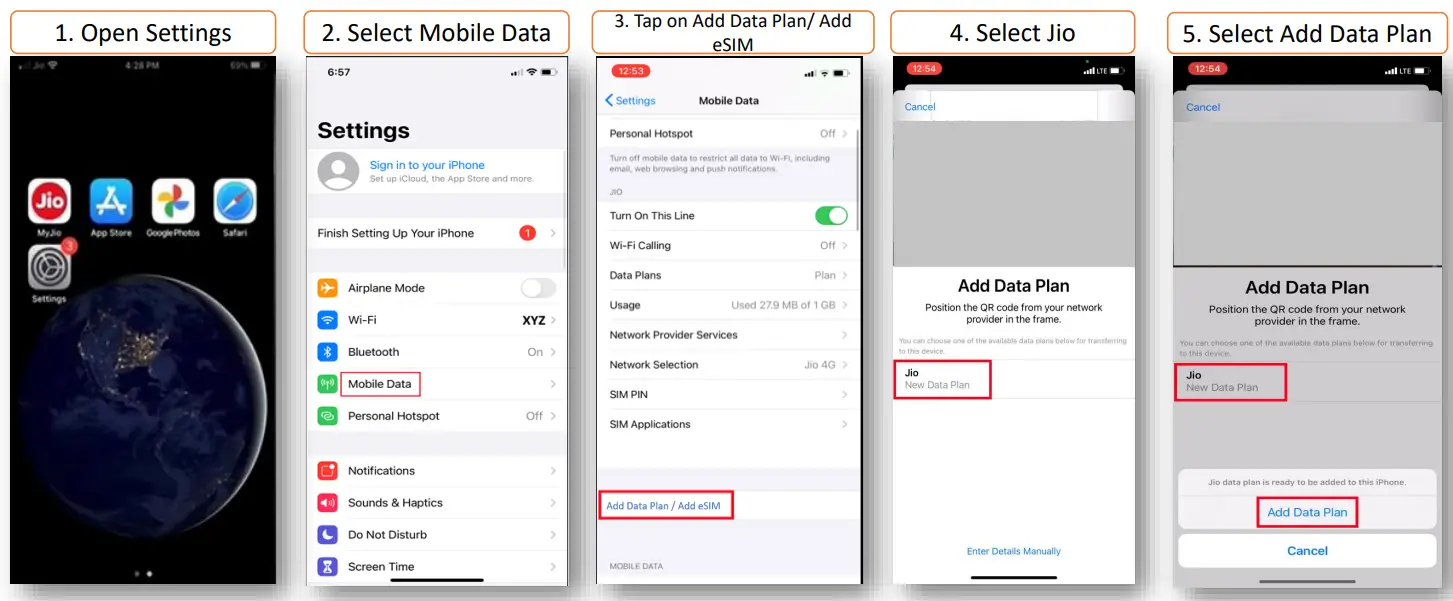
- Open Settings.
- Select ‘Mobile Data.’
- Tap on ‘Add Data Plan‘ or ‘Add eSIM.’
- Select ‘Jio.’
- Select ‘Add Data Plan.’
- Please wait while the selected data plan addition is in progress. It will take a few seconds.
- Tap on ‘Continue.’
- Your Jio eSIM will be successfully activated and will reflect under Mobile Data.
- You can now start using voice and data services on your iOS device.
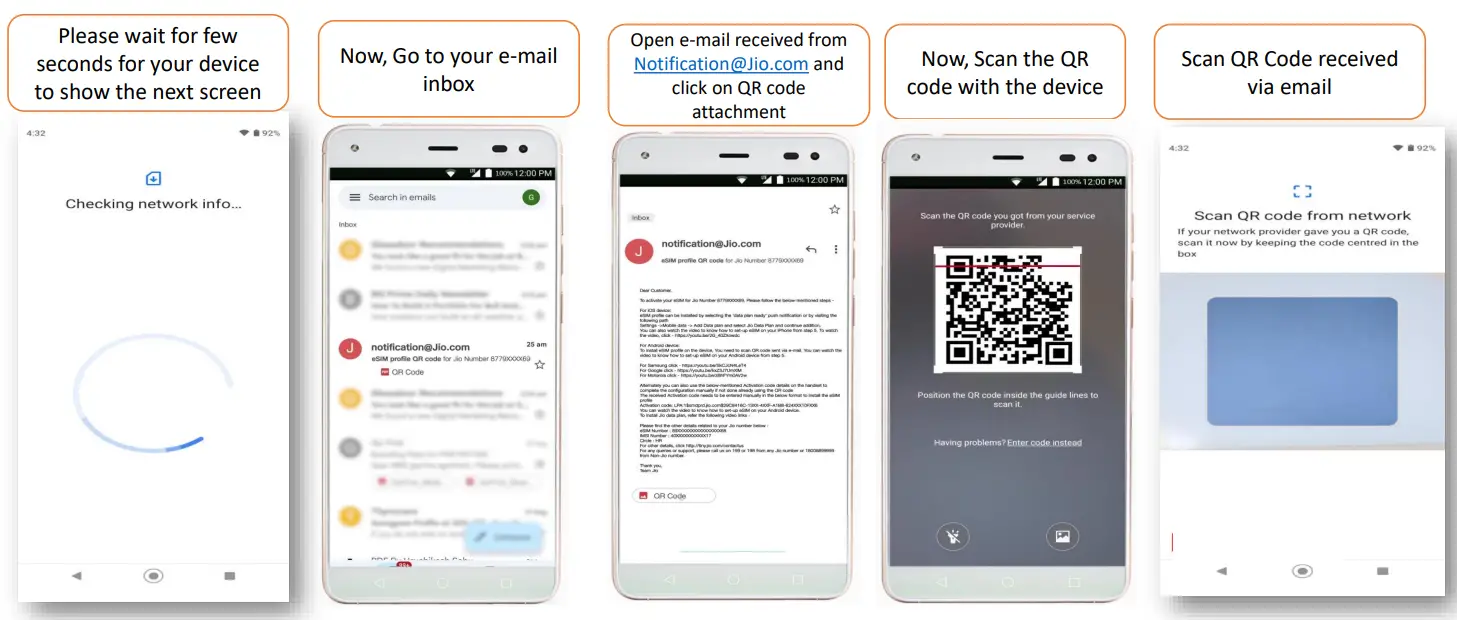
Jio eSIM Activation on Google Devices
Using QR Code
To activate Jio eSIM on your Google Pixel phone using QR code:
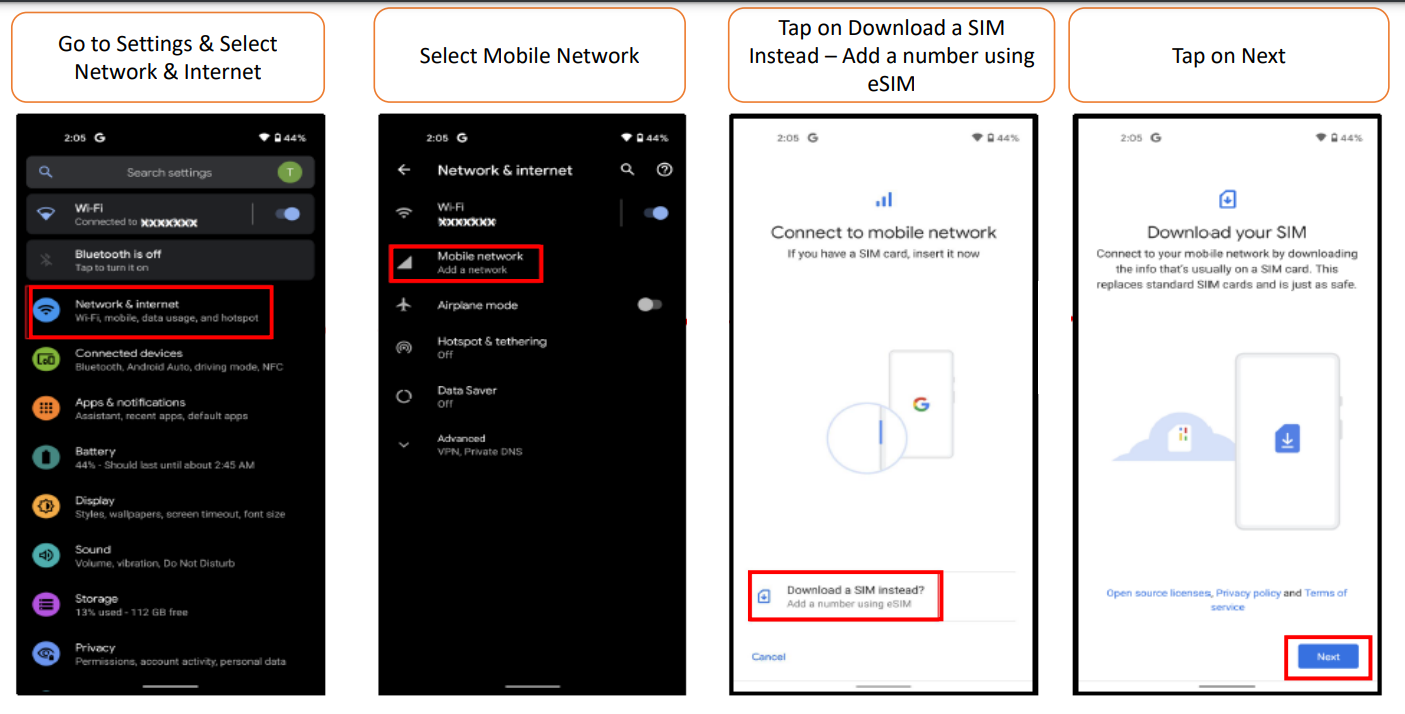
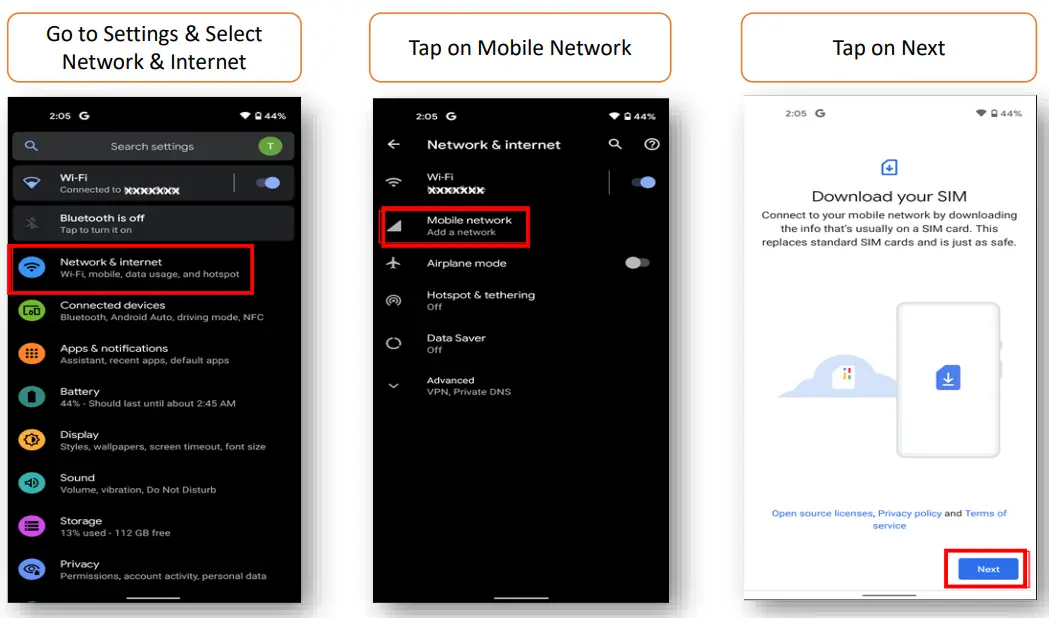
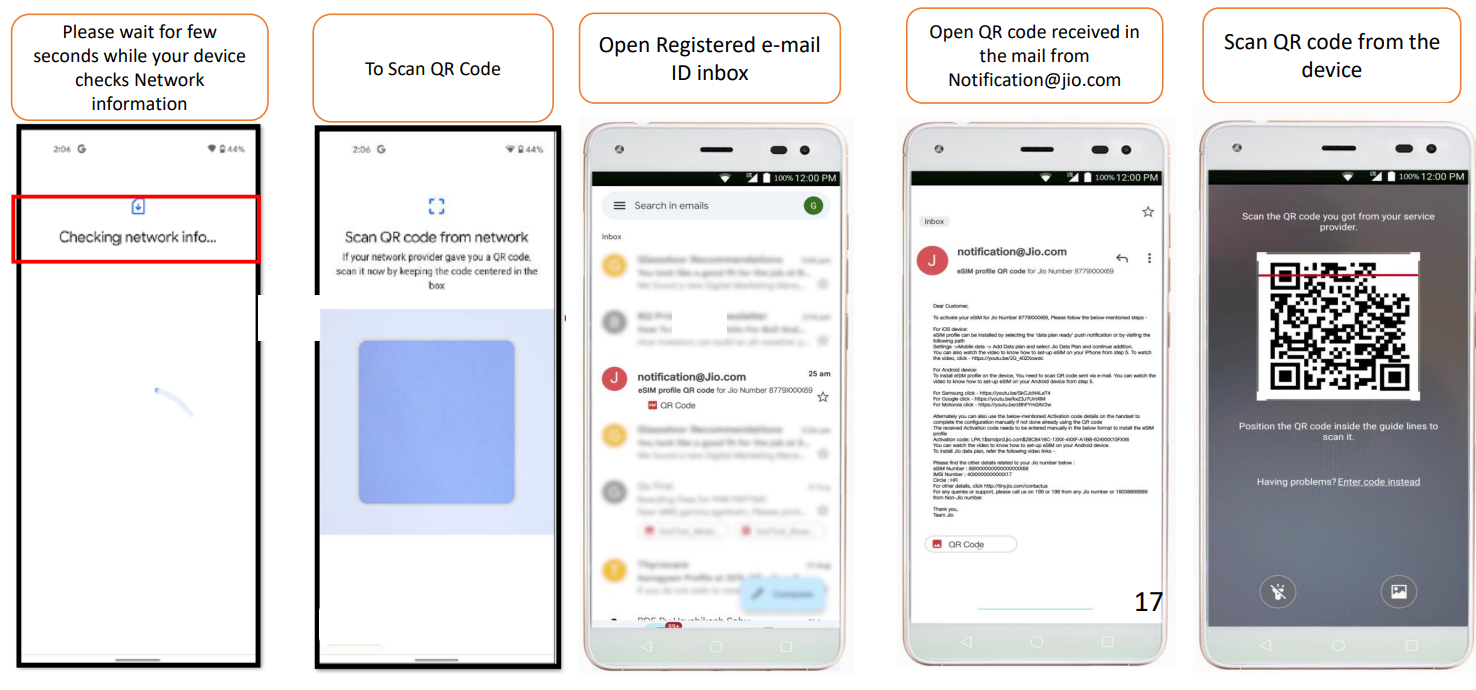
- Go to “Settings” & Select “Network & Internet“.
- Select “Mobile Network“.
- Tap on “Download a SIM Instead?“.
- Tap on “Next.”
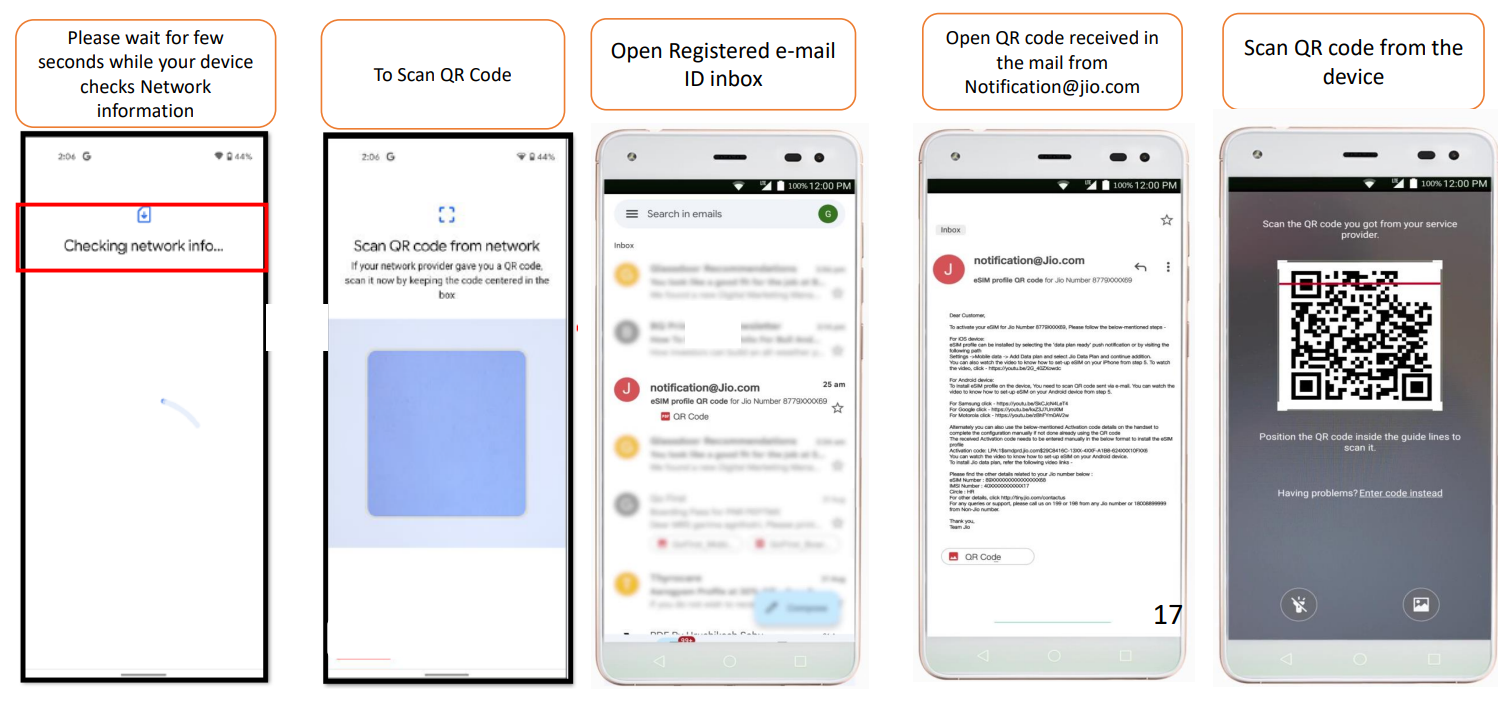
Please wait for a few seconds while your device checks Network information. - To scan the QR code, open the registered e-mail ID inbox.
- Open the QR code received in the mail from [email protected].
- Scan the QR code from the device.
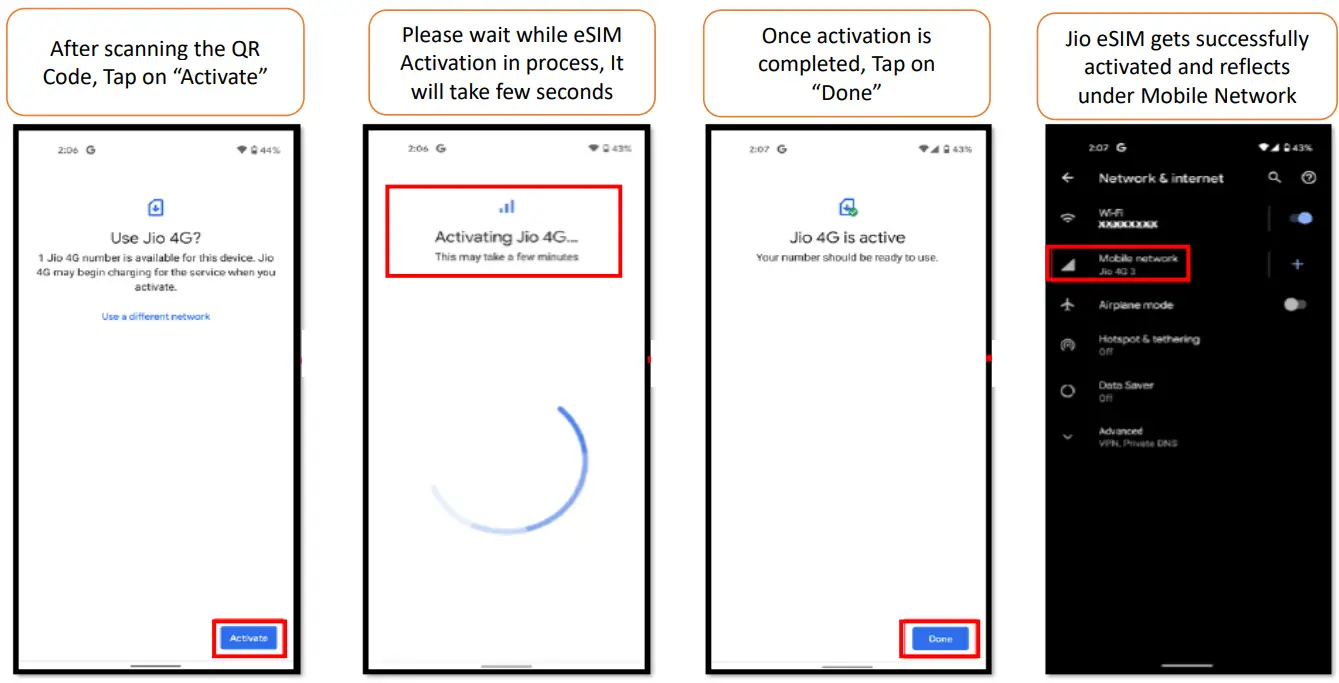
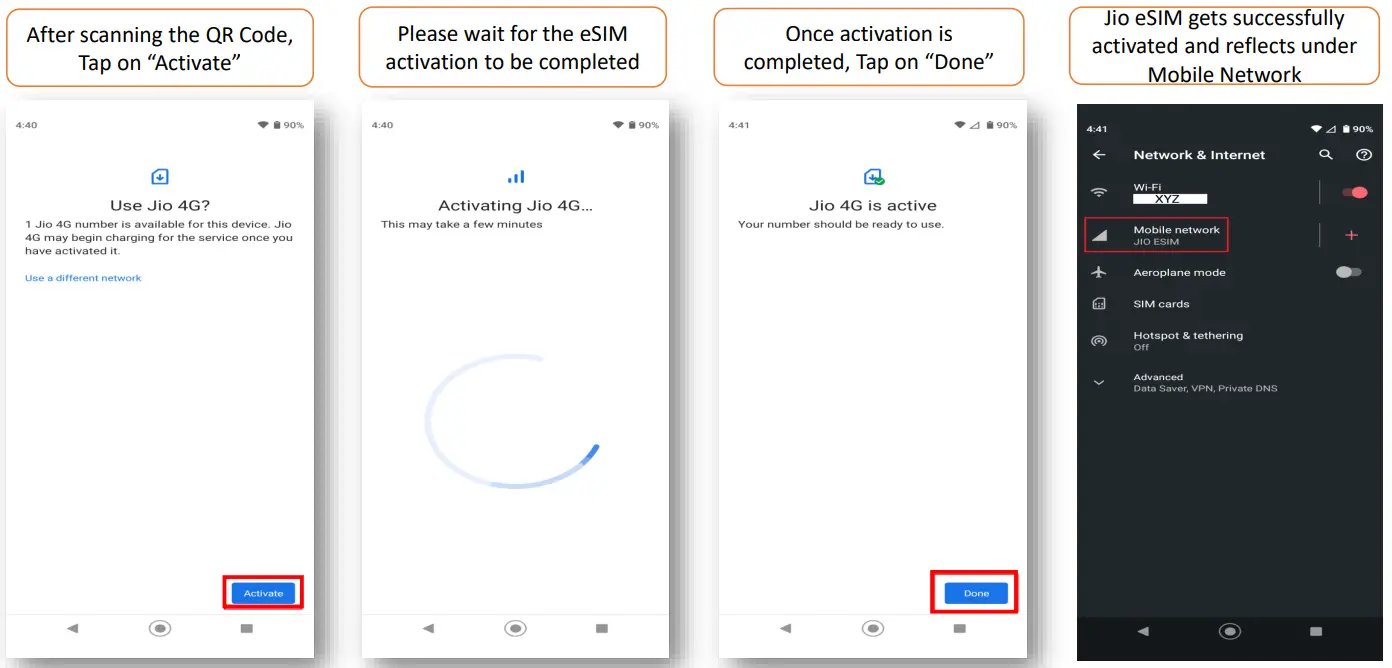
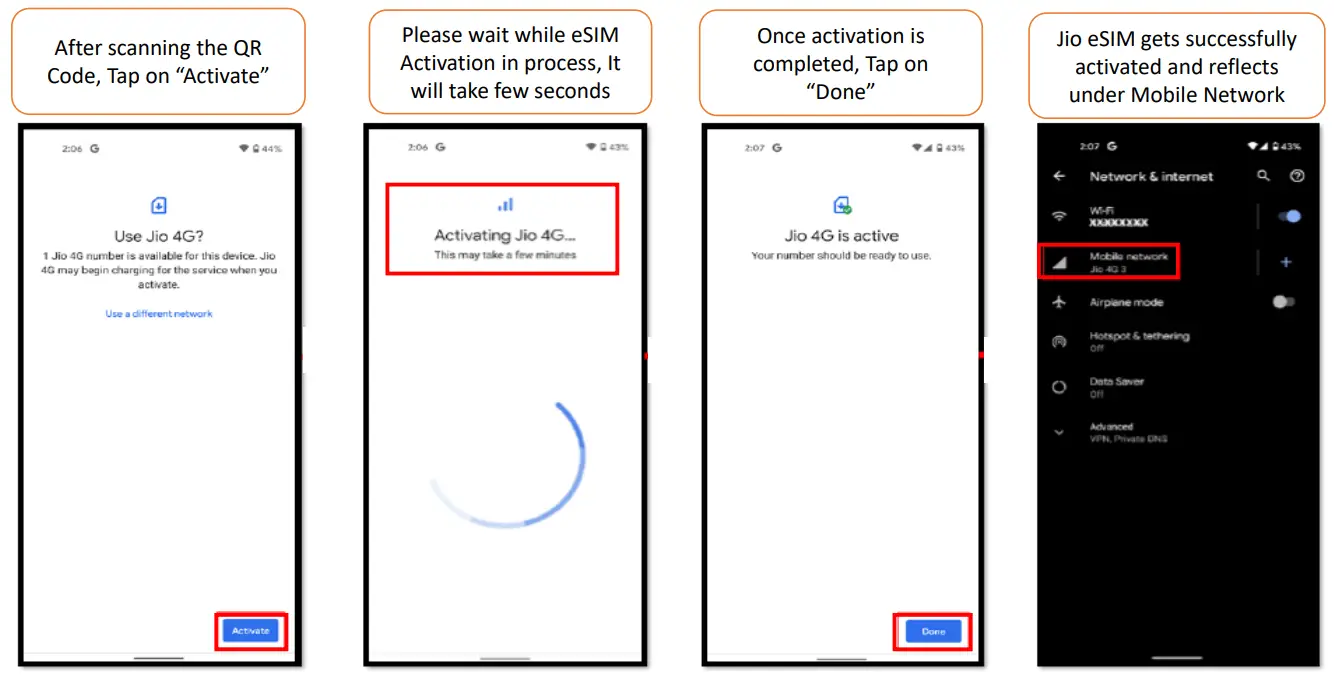
- After scanning the QR code. Tap on “Activate.”
Please wait while eSIM activation is in process. It will take a few seconds. - Once activation is completed, tap on “Done.”
- Jio eSIM gets successfully activated and reflects under Mobile Network.
Using Activation Code
If you are unable to scan the QR code, you can activate Jio eSIM on Google phone using the activation code. Here’s how:
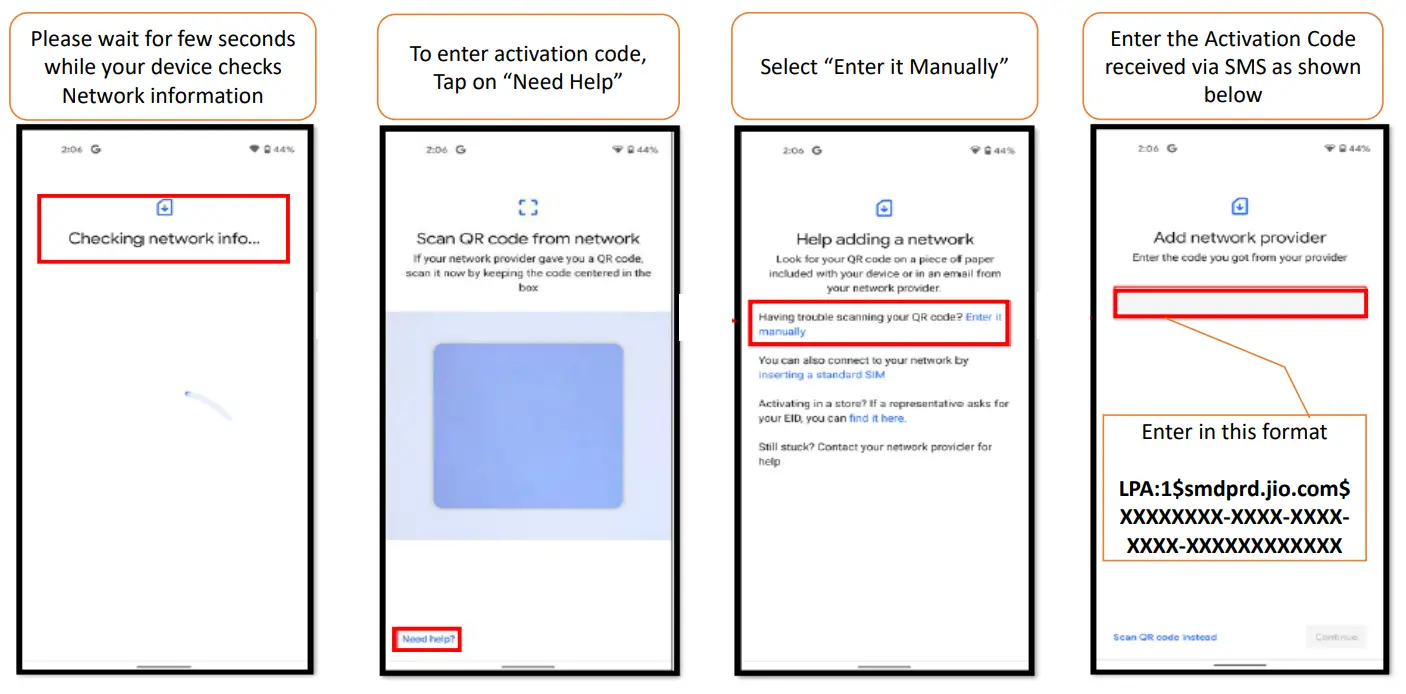
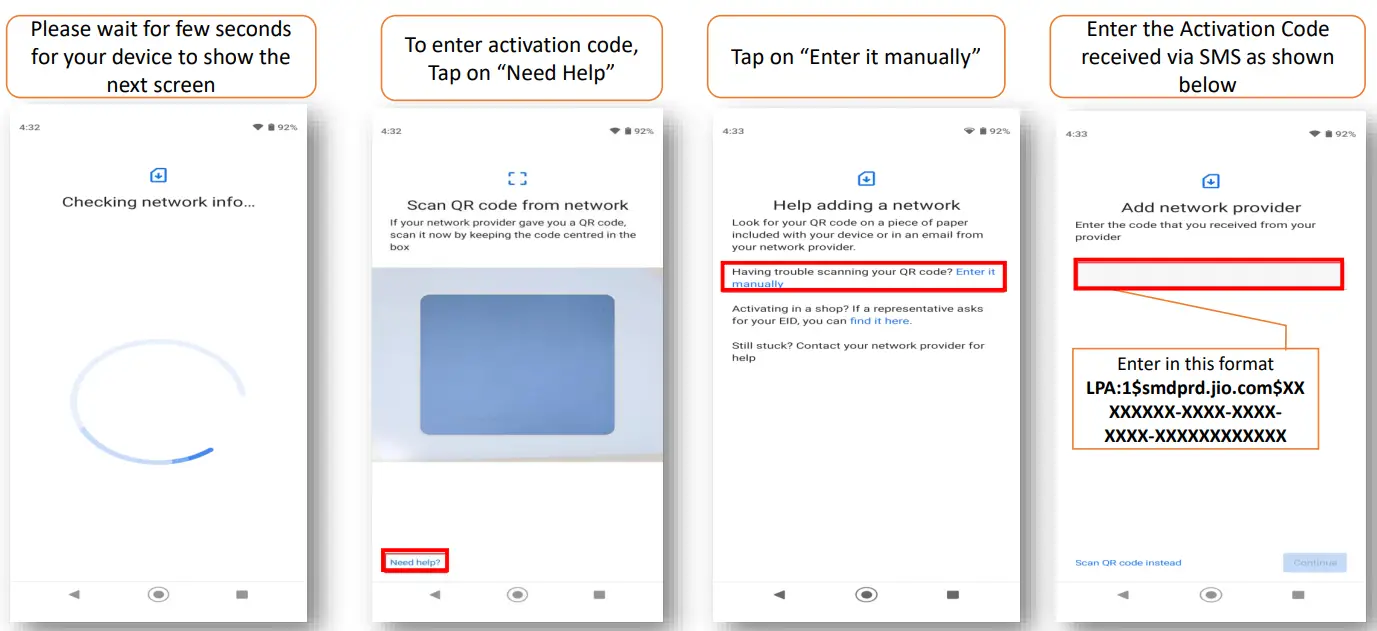
- After reaching step 4 of the previous section (using QR code), please wait for a few seconds while your device checks Network information.
- To enter the activation code, tap on “Need Help“.
- Select “Enter it Manually“.
- Enter the Activation Code received via SMS as shown below.
- After entering the activation code, tap on “Activate“.
- Please wait while eSIM activation is in process. It will take a few seconds.
- Once activation is completed, tap on “Done“. Jio eSIM is successfully activated.
Jio eSIM Activation on Samsung Devices
Using QR Code
To activate Jio eSIM on your Samsung phone using QR code:
- Go to Settings & Select Connections.
- Tap on “SIM Card Manager“, then “Add Mobile Plan“.
- Select “Scan Carrier QR Code“.
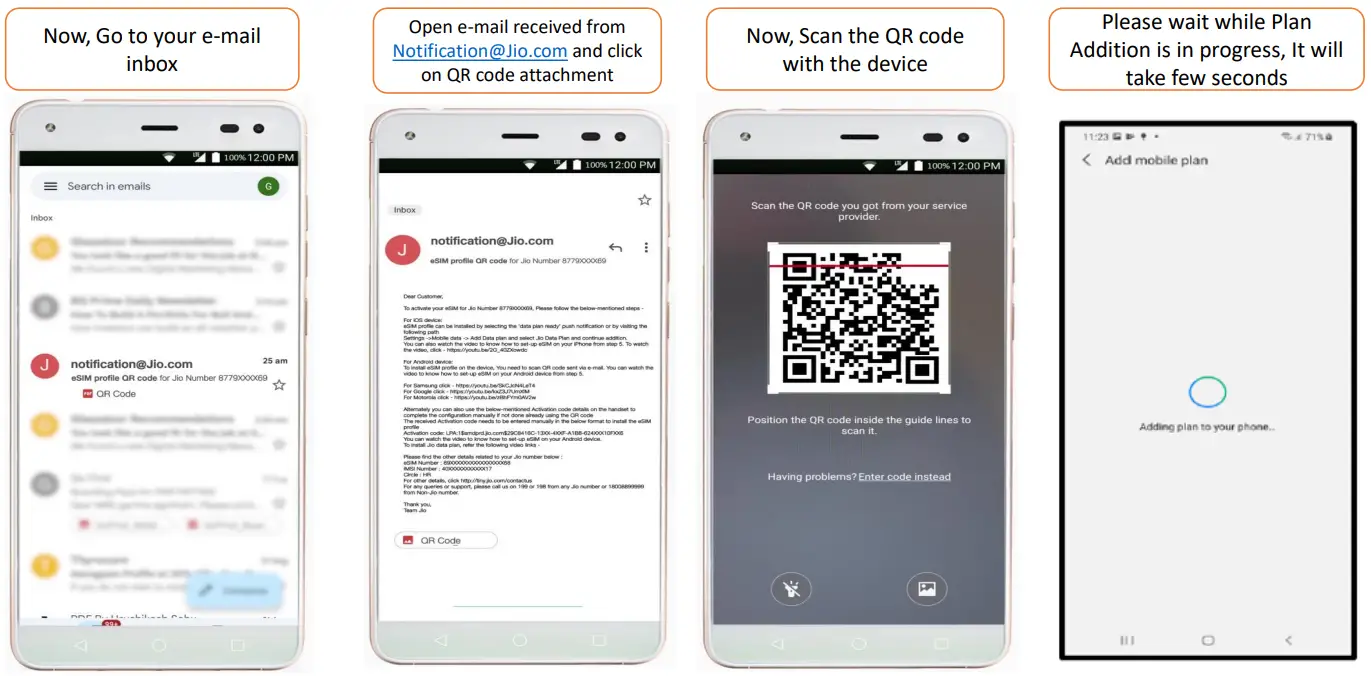
- Now, go to your e-mail inbox.
- Open the e-mail received from [email protected] and click on the QR code attachment.
- Scan the QR code with the device.
- Please wait while Plan Addition is in progress.
- After Plan addition is completed, Jio eSIM gets successfully activated.

Using Activation Code
If you are unable to scan the QR code, you can activate Jio eSIM on Samsung phone using the activation code. Here’s how:
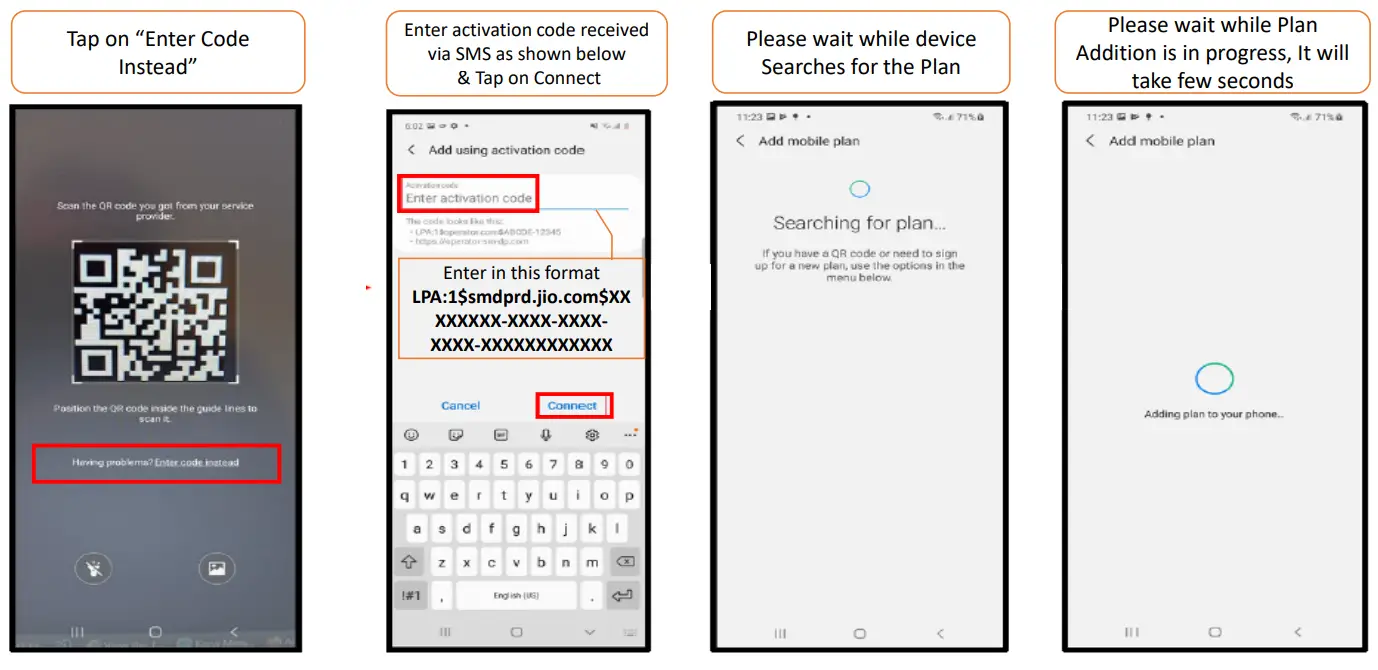
- After reaching step 4 of the previous section (using QR code), tap on “Enter Code Instead“.
- Enter activation code received via SMS as shown below & tap on Connect.
- Please wait while the device searches for the plan and the plan Addition is in progress. It will take a few seconds.
- After Plan addition is completed, Jio eSIM gets successfully activated and reflects under SIM card manager.
Jio eSIM Activation on Motorola Devices
Using QR Code
To activate Jio eSIM on your Motorola phone using QR code:
- Go to Settings & Select Network & Internet.
- Tap on Mobile Network, then click Next.
- Wait for a few seconds for your device to show the next screen.
- Scan the QR Code received via email.
- Now, go to your e-mail inbox.
- Open the e-mail received from [email protected] and click on the QR code attachment.
- Scan the QR code with the device.
- After scanning the QR Code, tap on “Activate.”
- Please wait for the eSIM activation to be completed.
- Once activation is completed, tap on “Done”. Jio eSIM gets successfully activated and shown under Mobile Network.
Using Activation Code
If you are unable to scan the QR code, you can activate Jio eSIM on Motorola phone using the activation code. Here’s how:
- After reaching step 3 of the previous section (using QR code), wait for a few seconds for your device to show the next screen.
- To enter the activation code, tap on “Need Help“.
- Tap on “Enter it manually“.
- Enter the Activation Code received via SMS as shown below.
- After entering the activation code, tap on “Activate“.
- Wait for the eSIM activation to be completed.
- Once activation is completed, tap on “Done“. Jio eSIM activation is done successfully.
Jio eSIM Activation on Vivo and Nokia Devices
Using QR Code
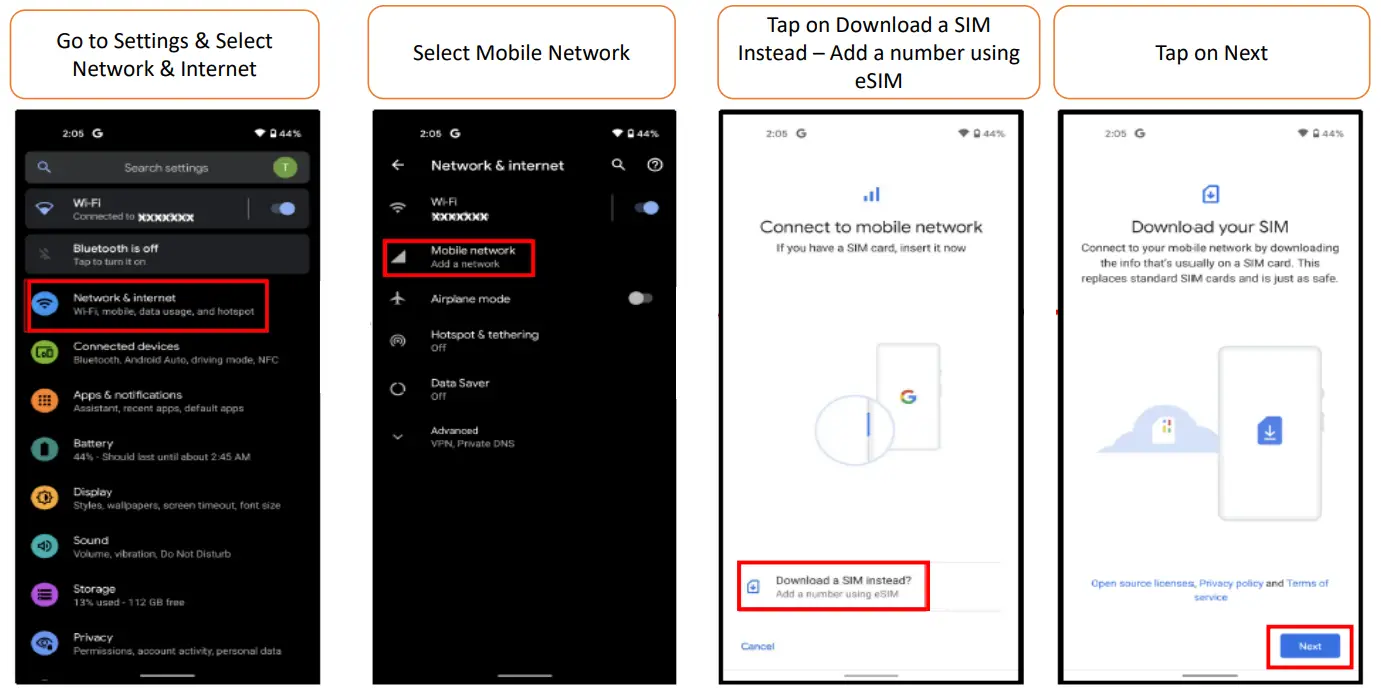
To activate Jio eSIM on your Vivo or Nokia phone using QR code:
- Go to Settings & Select Network & Internet.
- Select Mobile Network.
- Tap on “Download a SIM Instead – Add a number using eSIM“. Then click on Next.
- Wait for a few seconds while your device checks Network information.
- To Scan QR Code:
- Open the registered e-mail ID inbox.
- Open the QR code received in the mail from [email protected].
- Scan the QR code from the device.
- After scanning the QR Code, tap on “Activate“.
- Please wait while eSIM Activation is in process.
- Once activation is completed, tap on “Done“. That’s it.
Using Activation Code
If you are unable to scan the QR code, you can activate Jio eSIM on Vivo or Nokia phone using the activation code. Here’s how:
- After reaching step 4 of the previous section (using QR code), wait for a few seconds while your device checks Network information.
- To enter the activation code, tap on “Need Help“.
- Select “Enter it Manually“.
- Enter the Activation Code received via SMS as shown below.
- After entering the activation code, tap on “Activate“.
- Wait while eSIM Activation is in process. It will take a few seconds.
- Once activation is completed, tap on “Done” and your Jio eSIM gets successfully activated.

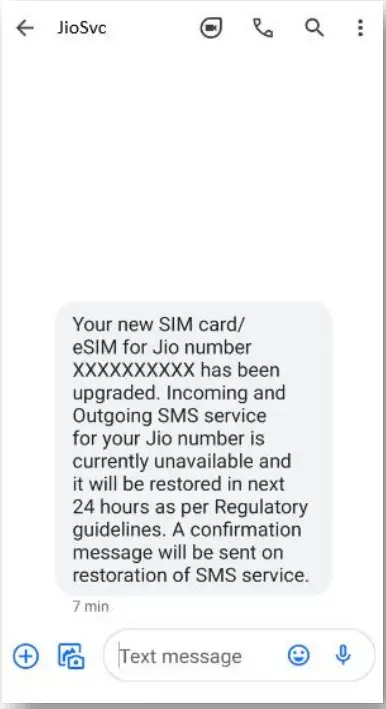
Note: In accordance with regulatory guidelines, SMS services on your Jio number will be unavailable for 24 hours following the eSIM upgrade.
Frequently Asked Questions
Here are some frequently asked questions regarding Jio eSIM and its activation:
What to do if i deleted my Jio eSIM mistakenly?
Please refrain from clicking on the “Erase SIM / Delete eSIM” option, as this action will permanently delete your eSIM profile, making you unable to use any Jio services.
If, by mistake, you have clicked on “Erase,” please visit your nearest Jio Store with your Proof of Identity to initiate a new request for eSIM. Unfortunately, in this case, it will not be possible to configure the new eSIM using the SMS process.How to check if my email id is registered for my Jio number?
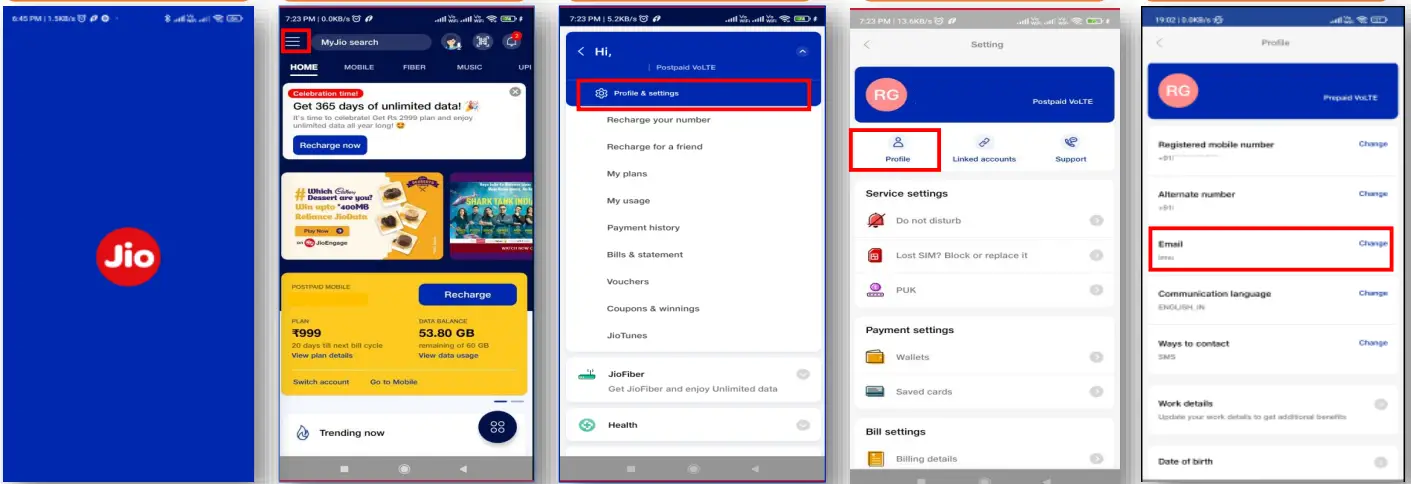 To Check Your Registered Email ID on MyJio App:
>Open the MyJio app.
>Click on Menu.
>Tap on “Profile and Settings“.
>Tap on “Profile“.
>Check your registered email ID.What to do if the email id is not registered or updated incorrectly on My Jio App?
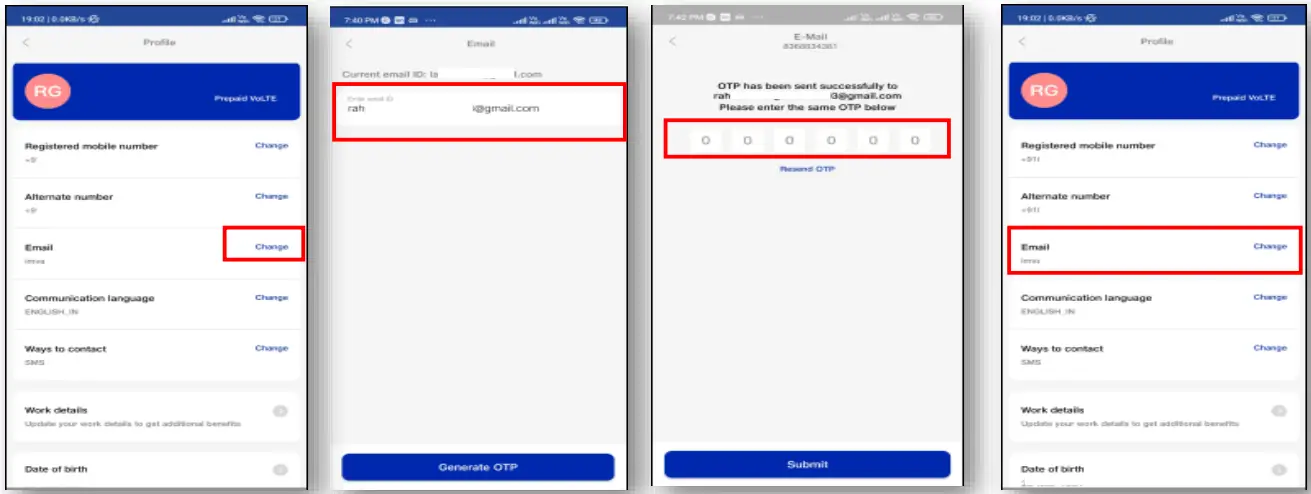 To Update Your Email ID on My Jio app:
>Tap on “Change.”
>Enter the correct email ID.
>Enter the OTP sent to the new email ID & Submit.
>Check if the new email ID is updated.
That’s it! Now that your eSIM is activated, enjoy the digital experience. If you encounter any issues, feel free to comment below.